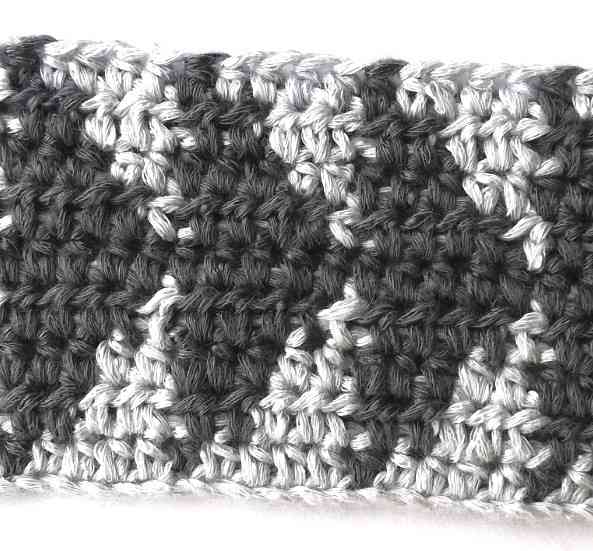
Tapestry crochet is a technique allowing to use multiple colors in the same row or round. The main principle is to carry the yarns of all colors along while you crochet.
This tutorial shows how to use this technique and includes written step-by-step instructions with photos explaining how to read tapestry crochet charts, how to work in rows and in rounds. Also, it shows the difference of using a single crochet (sc), a half double crochet (hdc), a double crochet (dc) and a modified single crochet (msc) in tapestry crochet.
Nordic Hook Club
Join Nordic Hook Club and get access to one of the largest crochet stitch libraries! There you will find hundreds of ad-free downloadable crochet stitch tutorials that include detailed step-by-step photo instructions, concise written patterns and member-exclusive charts. Plus, you can download all Nordic Hook patterns, stitches and e-books for free! Read more about all the membership benefits here and sign up today.
Read more and sign up!Pinterest: You can save this tutorial to Pinterest for later here.
How to follow the chart
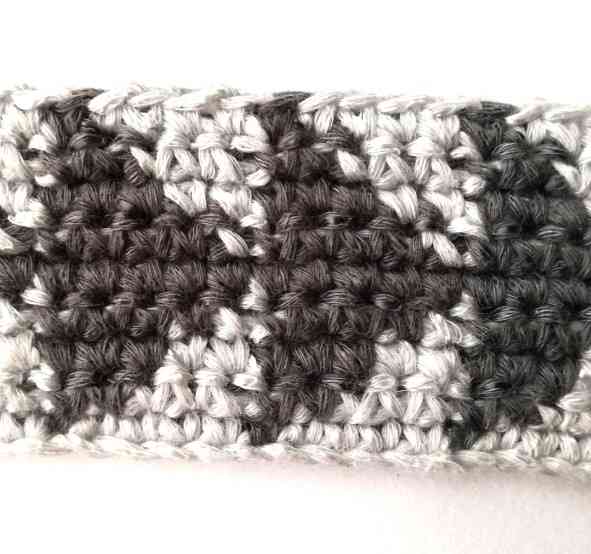
The chart for tapestry crochet does not indicate a particular stitch, instead is shows the color scheme you should follow. Each square indicates one stitch: it can be a single crochet, a double crochet, etc. The number of columns tells the number of stitches in one row or round. In the chart that you see below, there are 30 columns, which means that you should start by chaining 30. Then, depending on the stitch you will use, you will add one, two or three for a turning chain. The rows in the chart marks a number of rows; the foundation chain does not count as a row. The foundation chain should be in the same color as the square 1:1.
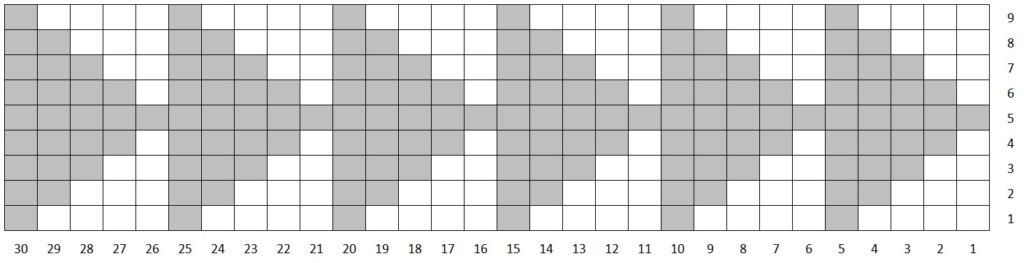
How you will read the chart will depend if you are working in rows or in rounds. If you are working in rows, you will read the pattern starting from the right side, from the square 1:1, and move to the left: it says to make 4 white stitches, one gray stitch, 4 white, then one gray again. It goes like this until the end of the row and you will finish with the gray stitch (square 30:1). When you will finish the row, you will turn your work around. Now you have to read the pattern from left to right. So, you will make two gray stitches, then three white, two gray, three white and repeat this until the end of the row. Then you will turn your work around and read the pattern from right to left.
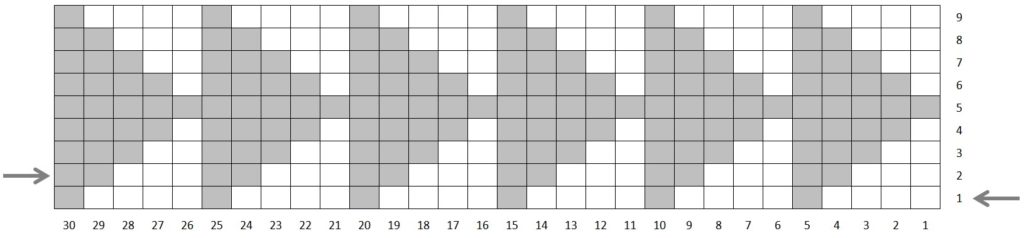
When you are working in rounds, you always read the pattern from right to left because you don’t turn your work around at the end each round.
Working in rows
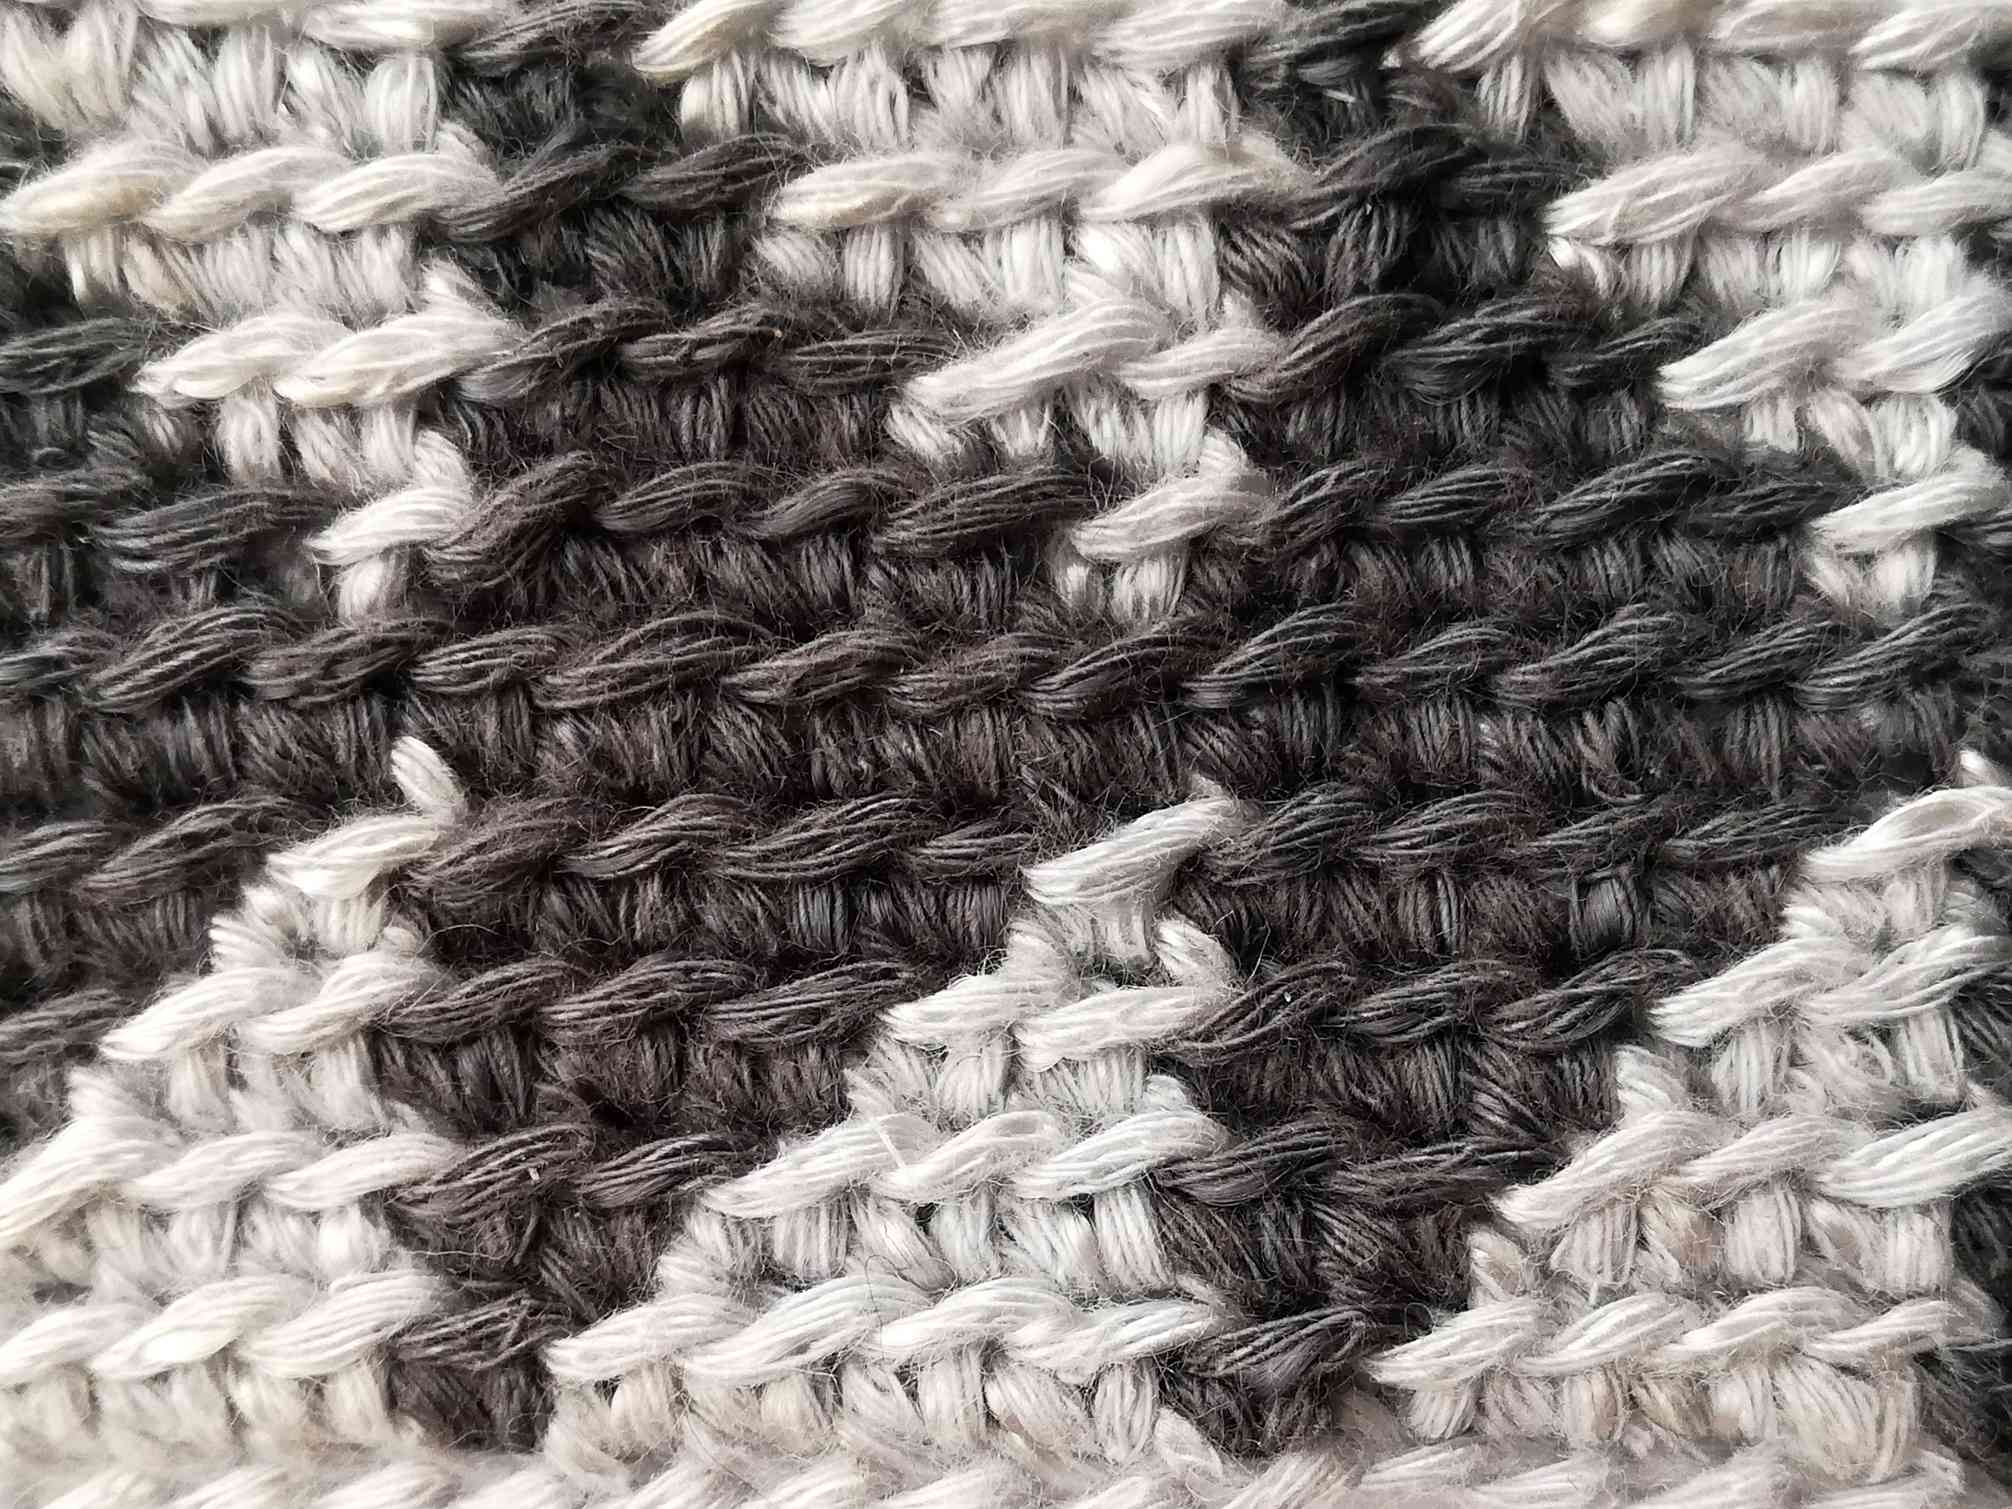
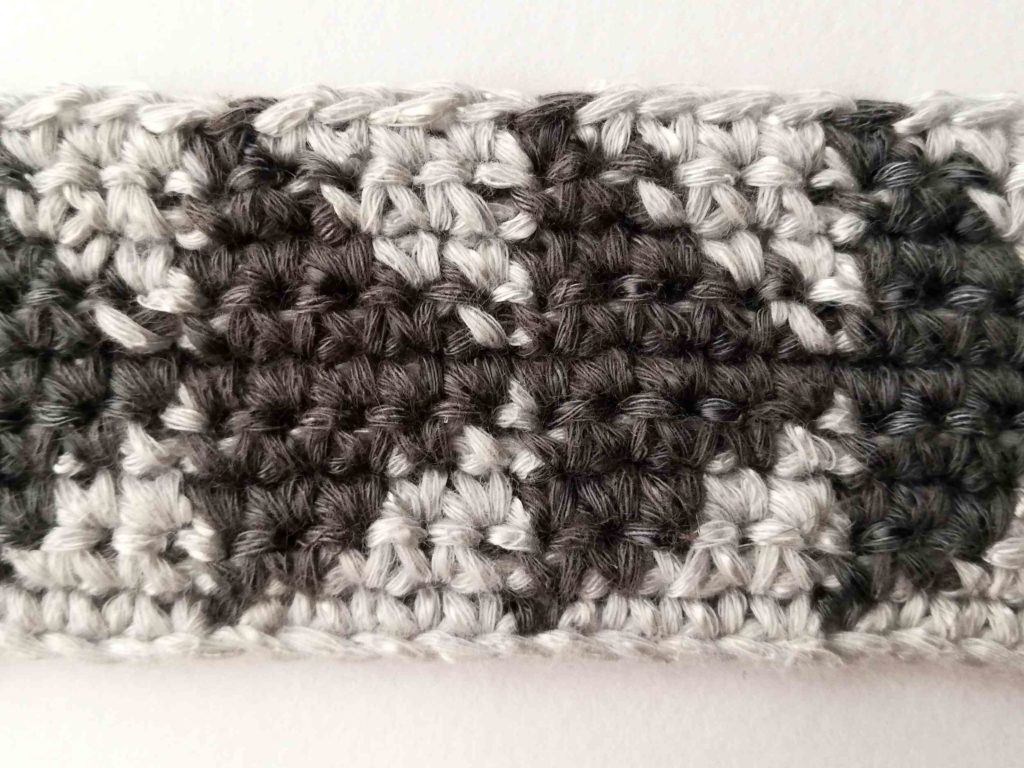
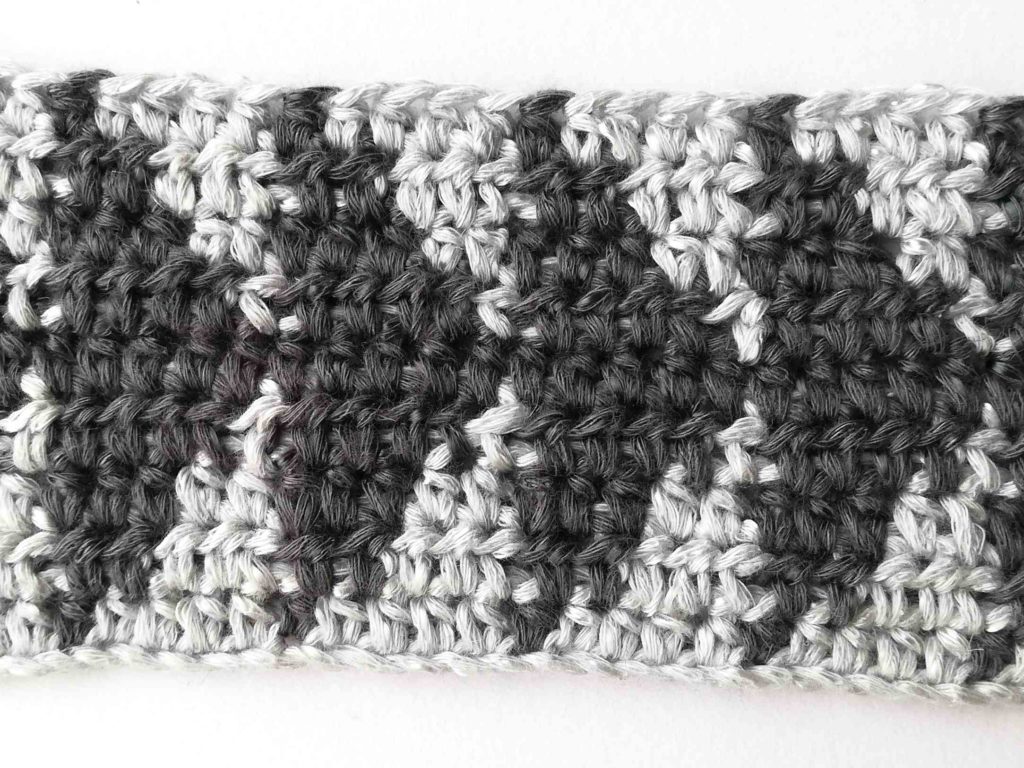
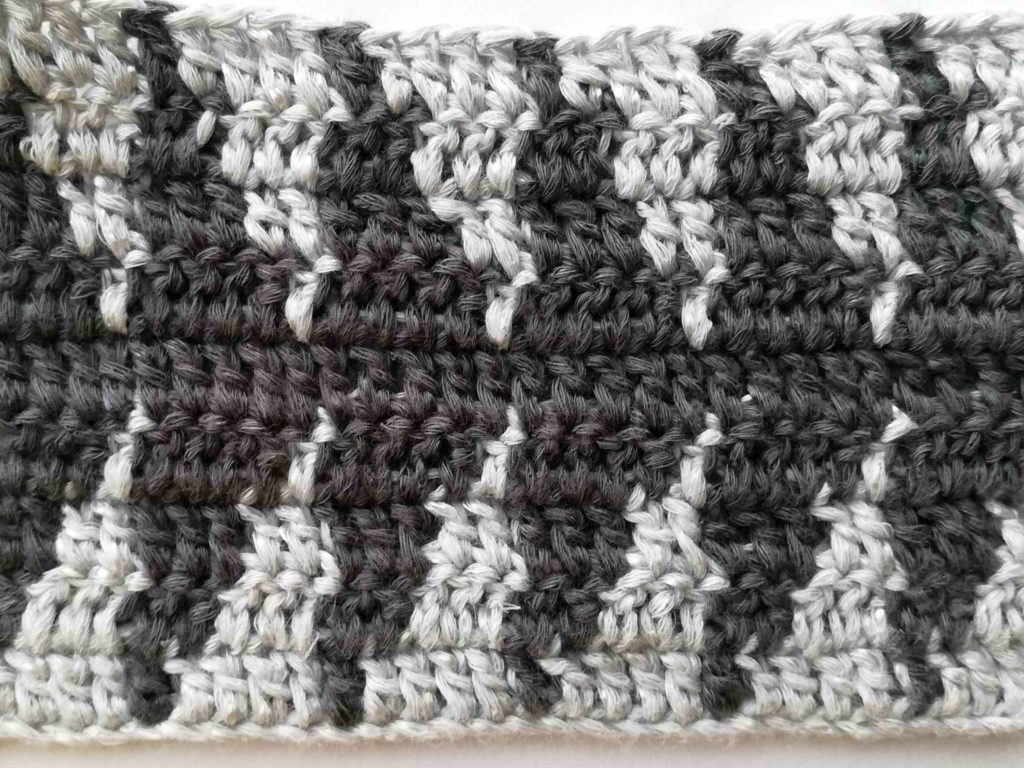
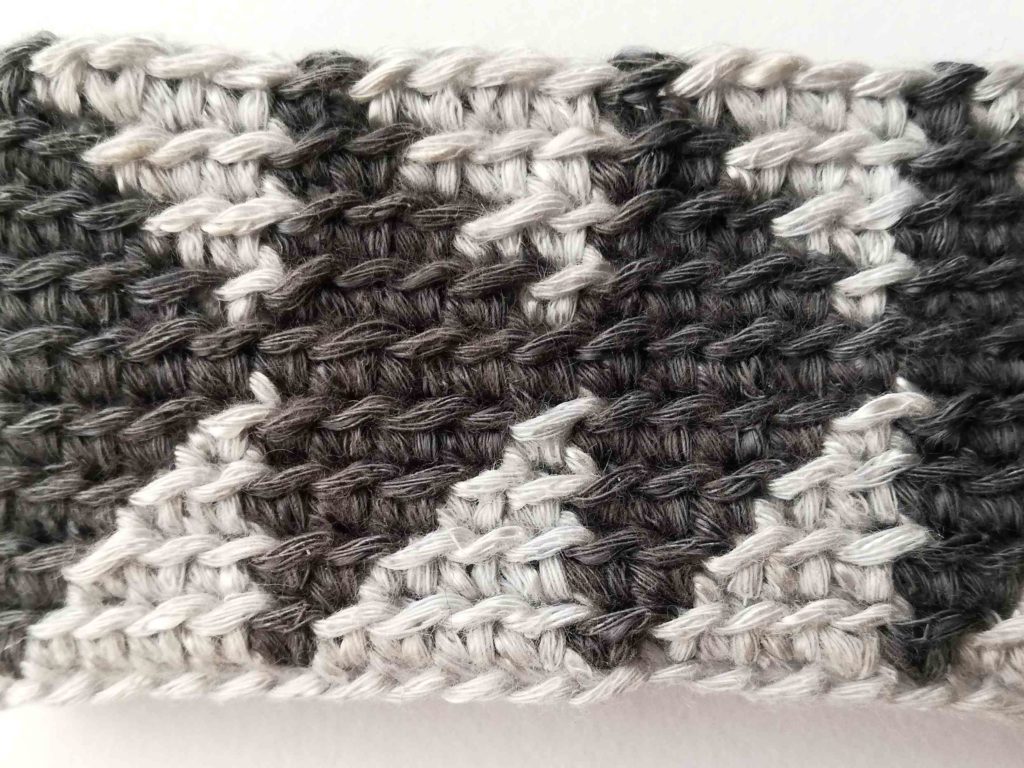
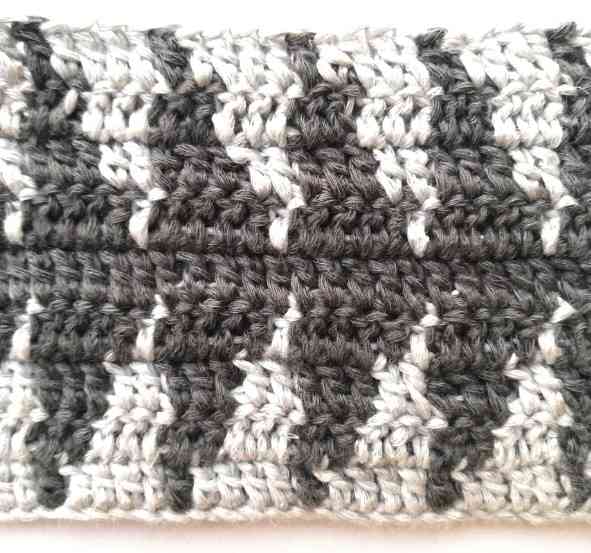
This tutorial includes three examples how you could use tapestry crochet working in rows. In the first example, I use the usual single crochet, in the second example, a half double crochet, and in the third one, a double crochet. In the photos below you can see the difference between them. As a single crochet is almost a square stitch, the sample looks closest to the picture in the chart. The taller the stitch that you use, the more extended pattern you will get. Take a look at the sample with double crochets: here the triangles are very tall and thin. Below you can find the photo instructions showing how make these samples.
Working in rounds
When you work in rounds, you can also chose the stitch you want to use. My personal favorite is a modified single crochet (msc): the difference from the usual single crochet is the you work only in the back loop and, to finish the stitch, instead of yarning over and pulling the yarn through both loops on your hook, you have to yarn under. In this way the stitch becomes slightly wider and this helps to hide the yarn that you are carrying along much better. Also, working in the back loop only gives a nice texture to the piece: you can notice small waves between the rows in the picture below.
You have two options how to move to the next round: you can join with a slip stitch and chain one or you could just continue to the next round without joining and chaining one. Both options have their pluses and minuses though. When you continue without joining with a slip stitch, there is no break in the texture of your work. However, you get a break in the color pattern (you can see that in the photo instructions below). When you join with a slip stitch, you can see the line of joining the rows, but there is no break in the color pattern. Personally, I think that the break in the texture is less noticeable than the break in the colors, therefore I usually chose to join the rounds with a slip stitch. Nonetheless, a more popular method is continuing without joining.
Photo instructions
Working in rows: single crochet
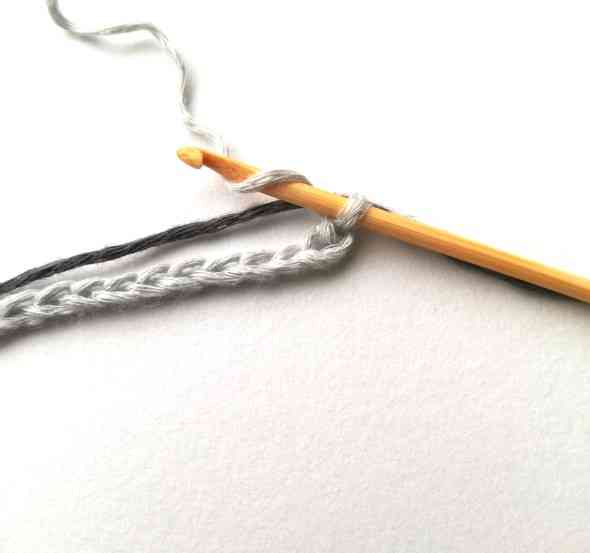
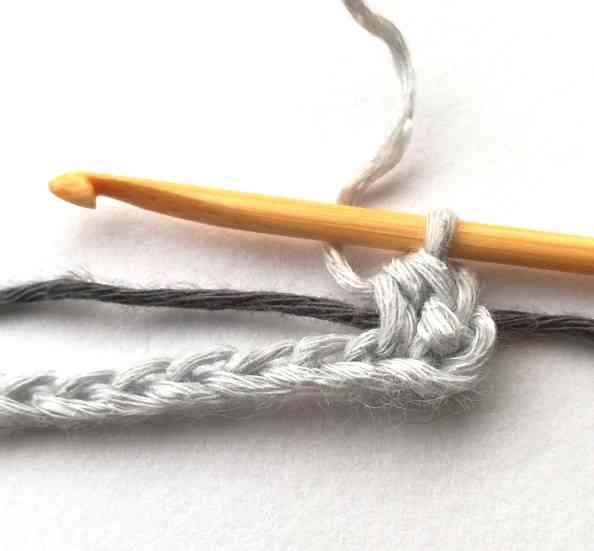
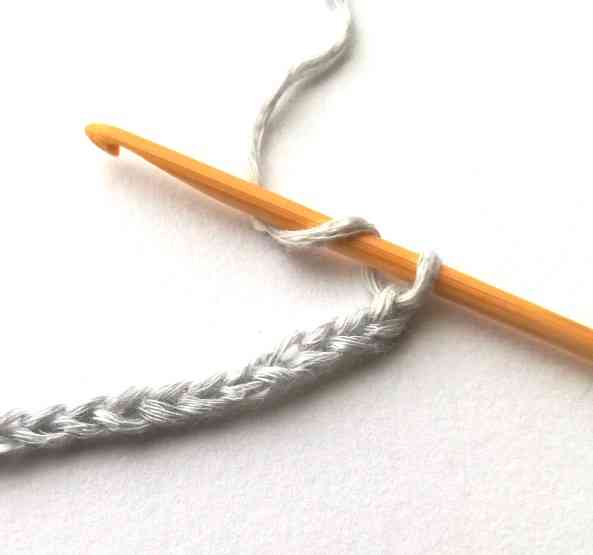
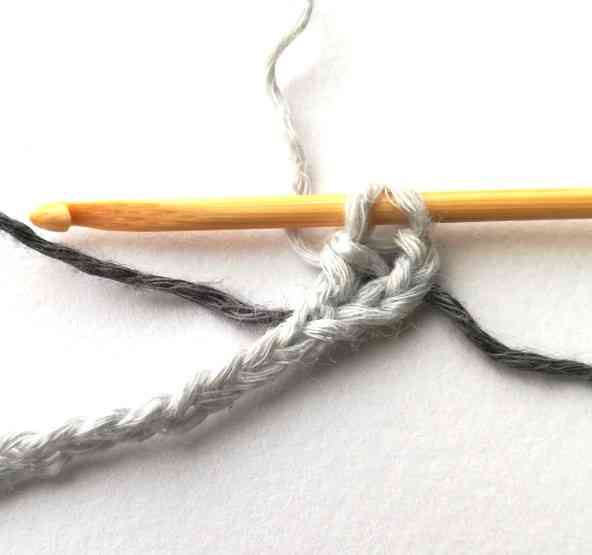
1. Start by chaining 30 + 1. Put your dark gray yarn behind the chain.
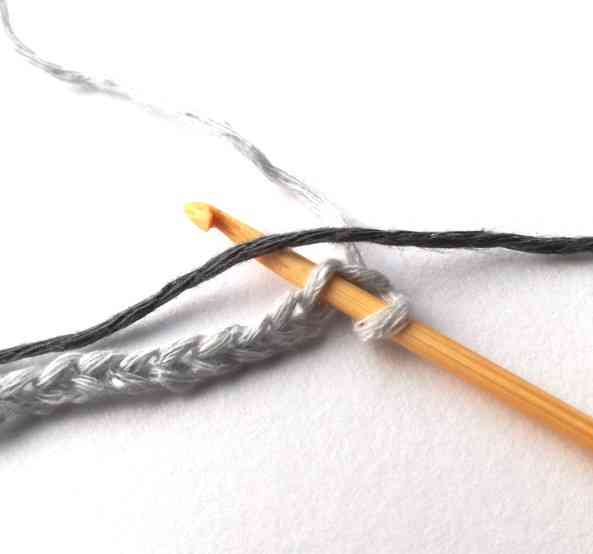
2. Insert your hook in the second chain from the hook.

3. Yarn over light gray yarn and pull it through. Now you have two loops on your hook.
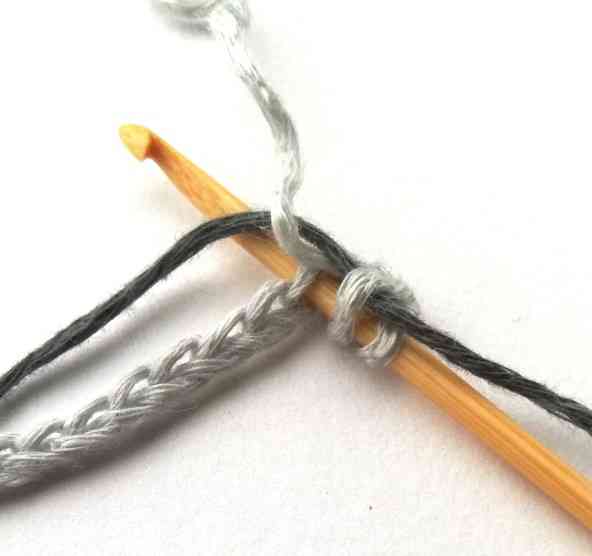
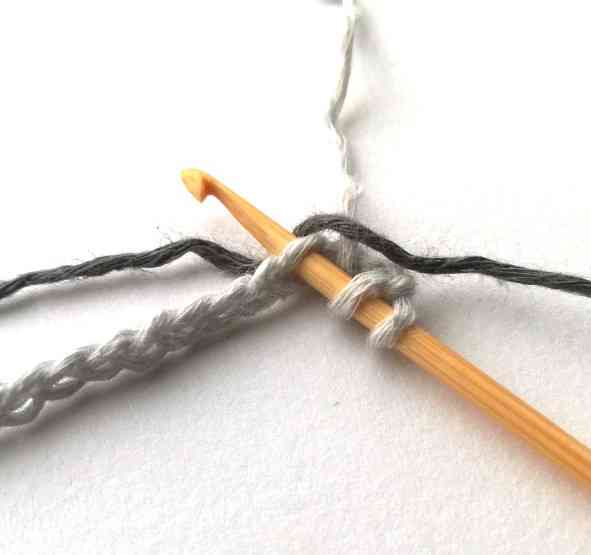
4. Yarn over the light gray yarn. Make sure that your dark gray yarn is wrapped by light gray yarn.
5. Pull the light gray yarn through both loops on your hook. You have just made the first sc and the dark gray yarn is now secured.
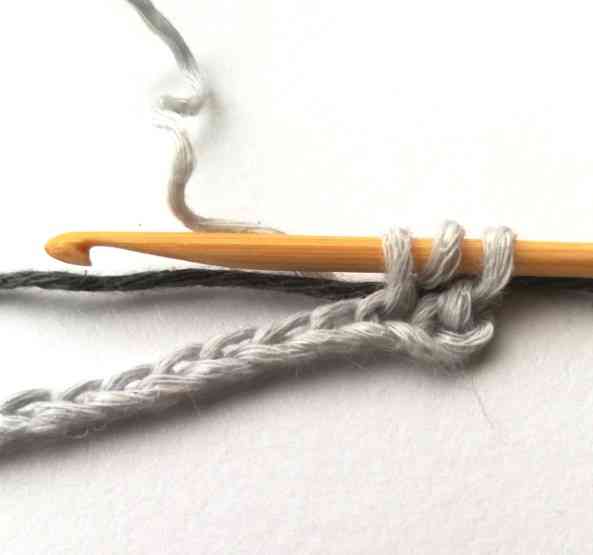
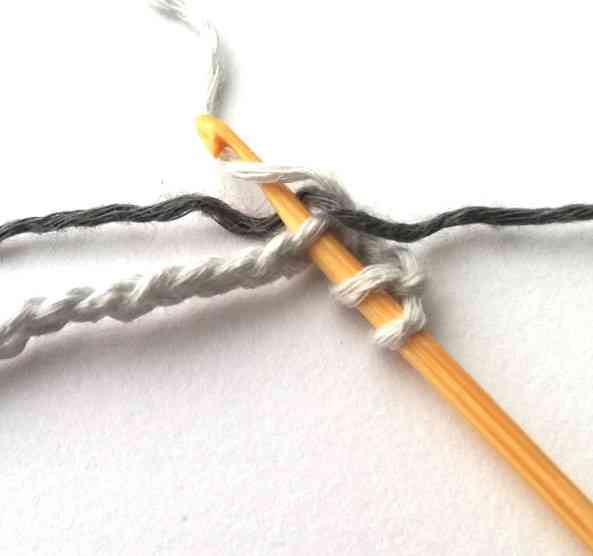
6. To make the second sc in light gray, insert your hook into the second stitch, keep your dark gray yarn behind the chain.
7. Yarn over the light gray yarn and pull through.
8. Yarn over and pull the yarn through both loops on your hook. Your second sc in light gray is done.
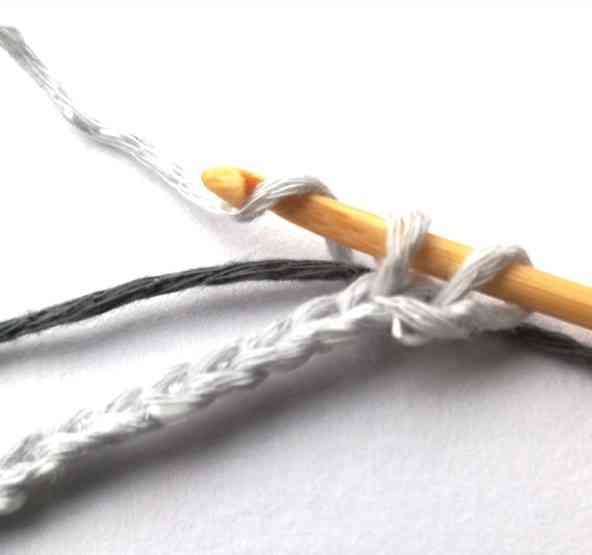
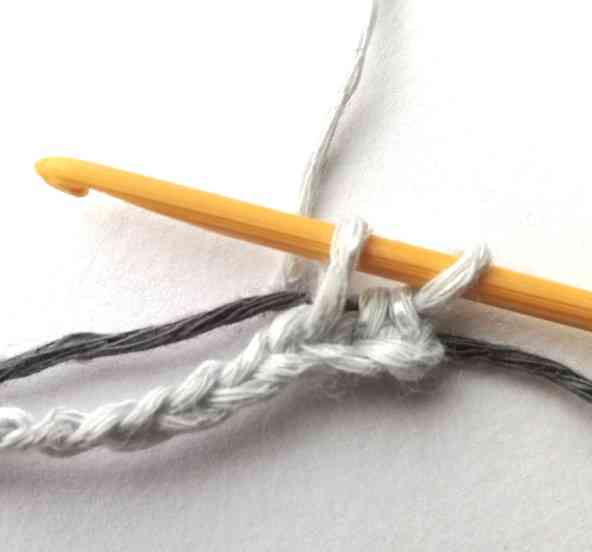
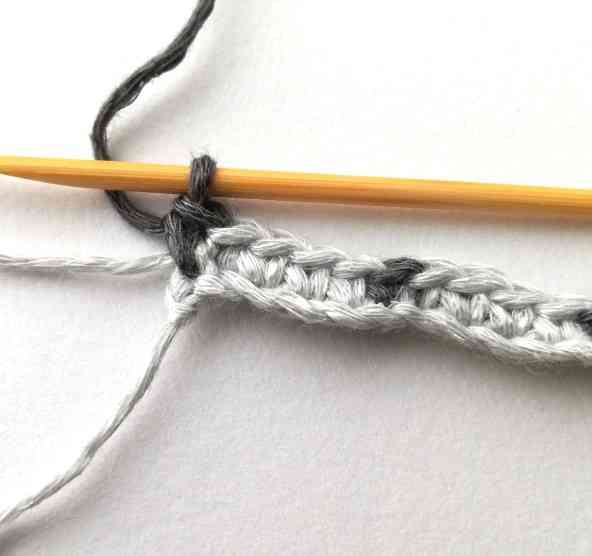
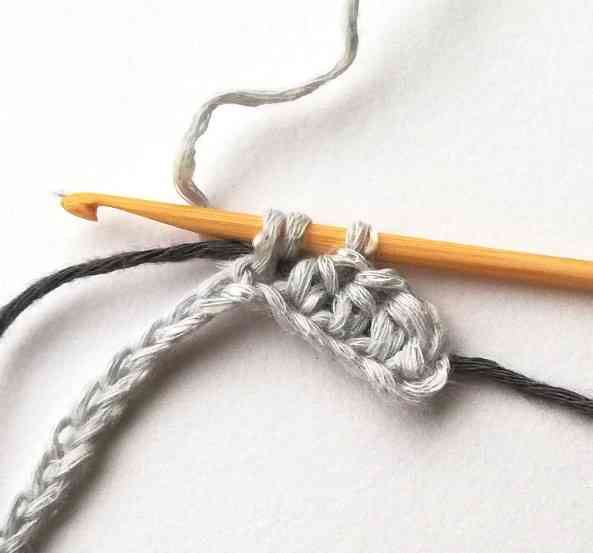
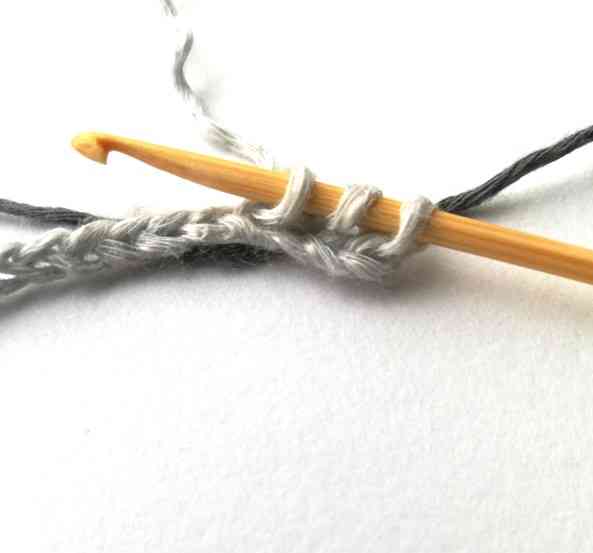
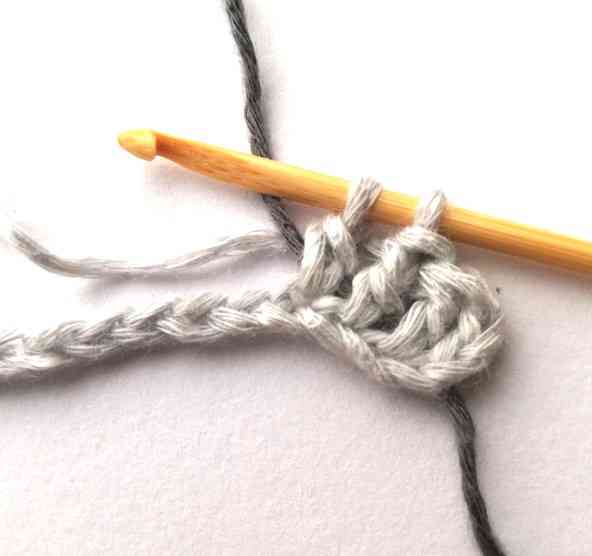
9. The chart shows that the fifth sc should be in dark gray. When you have to change color for the next stitch, you should finish your current stitch with the new color. So, when you are about to finish your fourth sc and you have two loops on your hook, stop.
10. Now you have to switch yarn: put the light gray yarn behind the chain and take the dark gray yarn up.
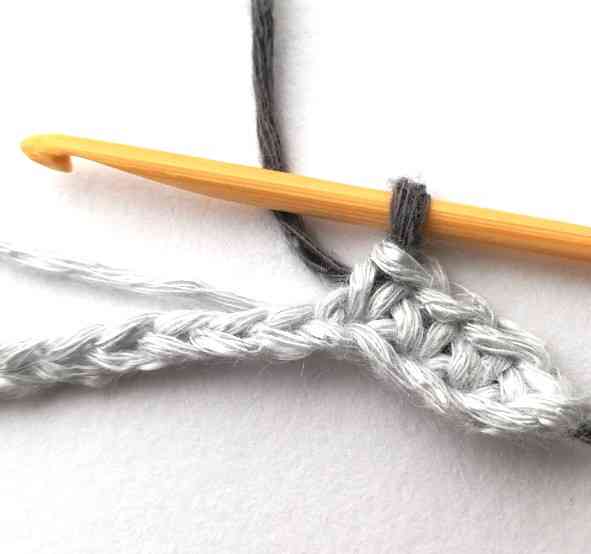
11. Yarn over the dark gray yarn and pull it through both loops on your hook. You have just changed color and dark gray yarn is ready to use.
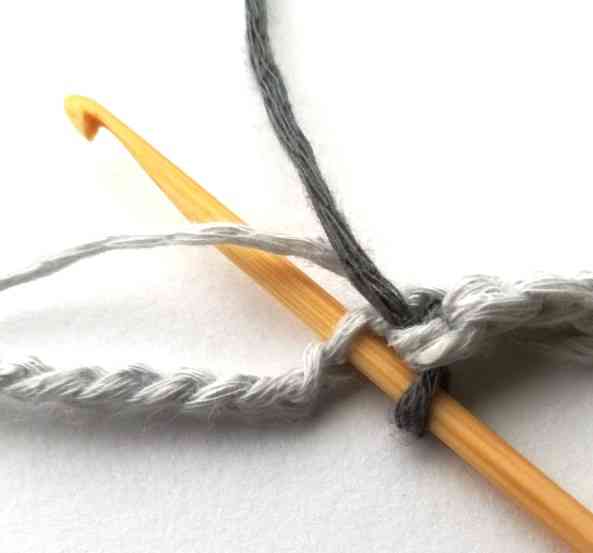
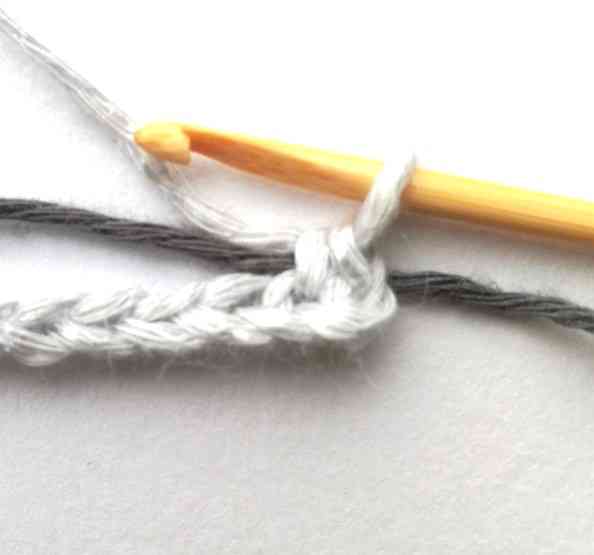
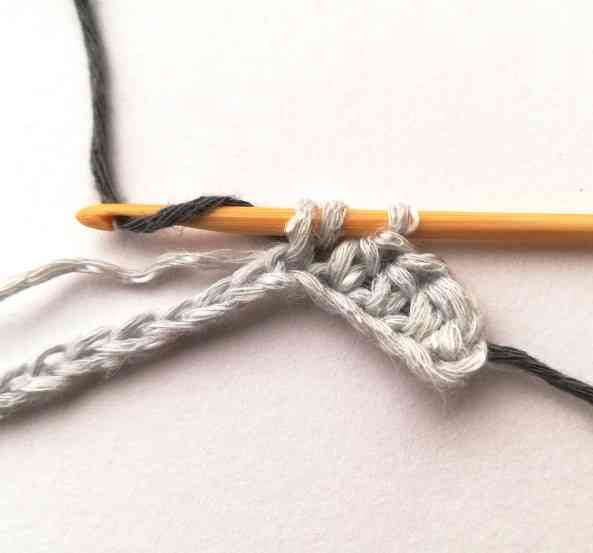
12. Insert your hook in the next stitch keeping the light gray yarn behind the chain.
13. Yarn over the dark gray yarn and pull through the loop. Now you have two loops on your hook. The chart shows that the sixth sc should be in light gray. Therefore, you have to move up the light gray yarn.
14. Yarn over the light gray yarn and pull though both loops on your hook. You have just changed color once again.
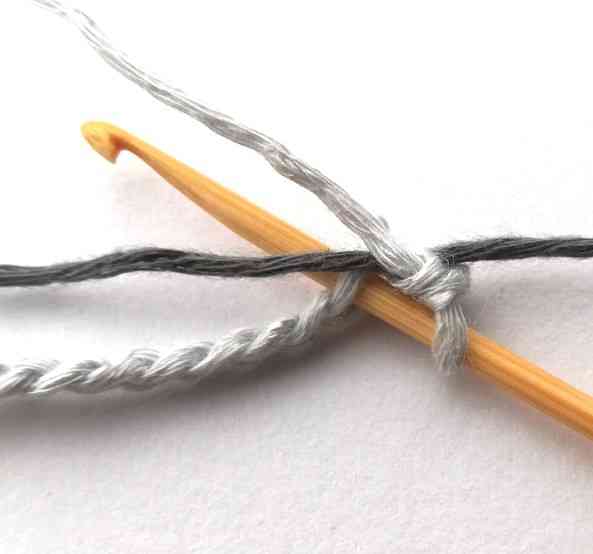
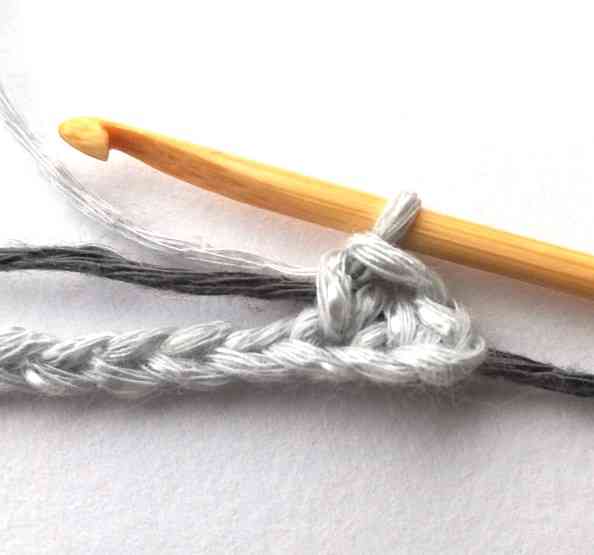
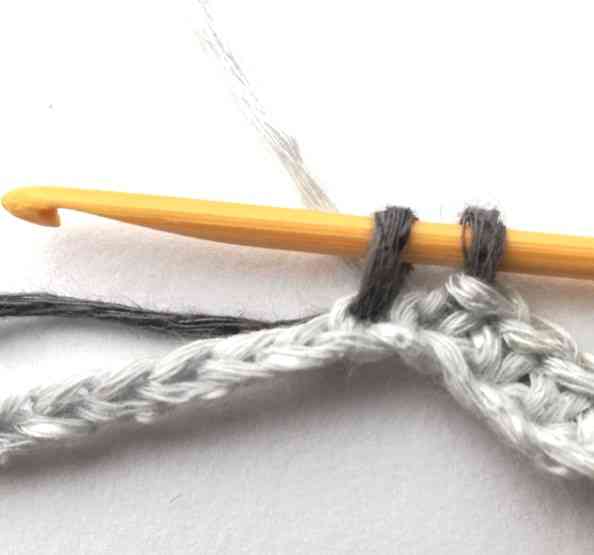
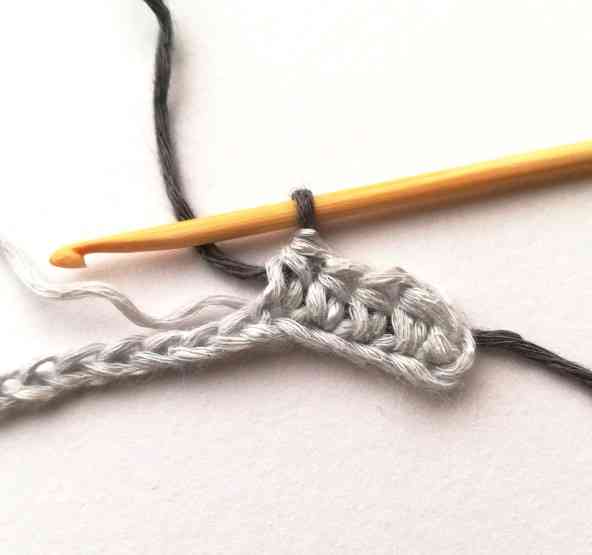
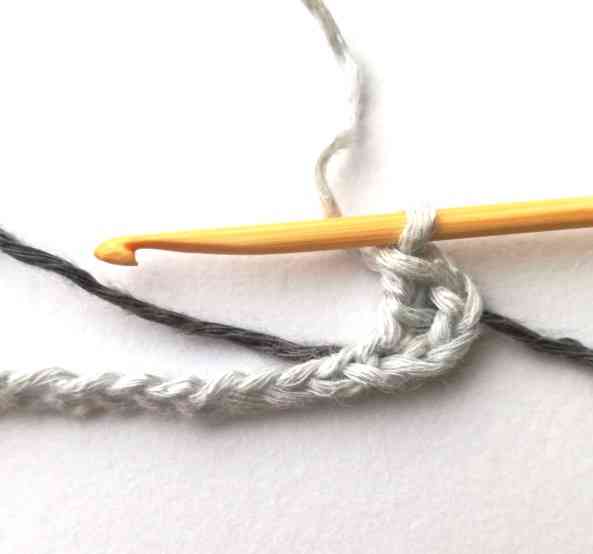
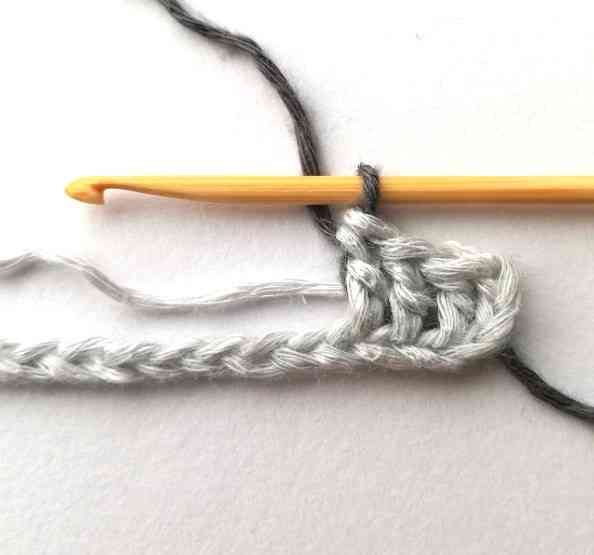
15. Finish the row with the dark gray yarn, as the chart says. As the first stitch in the second row is in dark gray, you should finish the last sc in the first row with the dark gray yarn. If the first stitch in the second row would be in light gray, you would have to finish the last stitch of the first row with the light gray yarn.
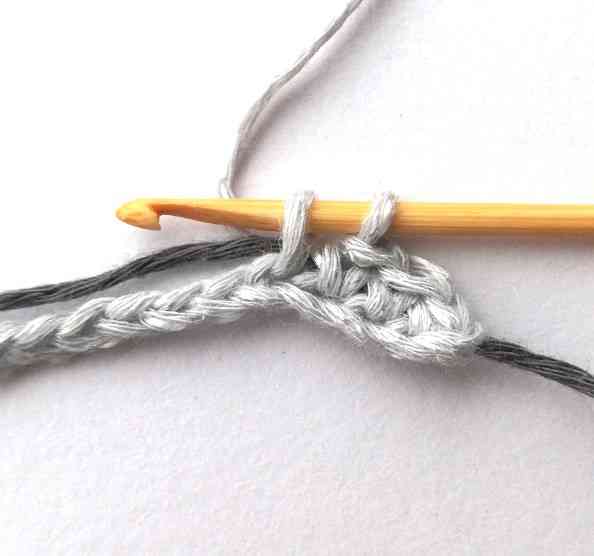
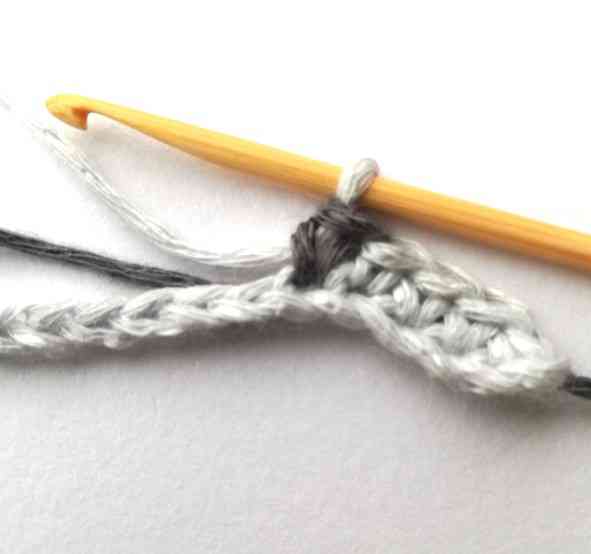
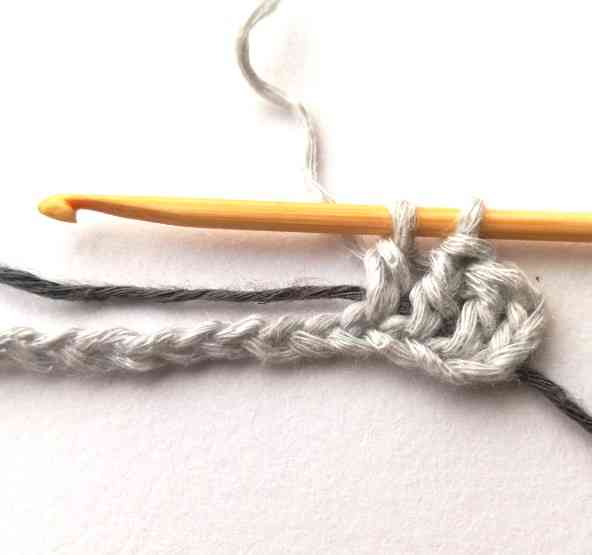
16. Chain one and turn your work around. When you are working in the ‘bad’ side, the yarn you don’t use should go in front of the chain that you see in the top. So, move the light gray yarn to the front. Then insert your hook into the first stitch grabbing its both loops.
17. Pull the dark gray yarn through. It should wrap the light gray yarn.
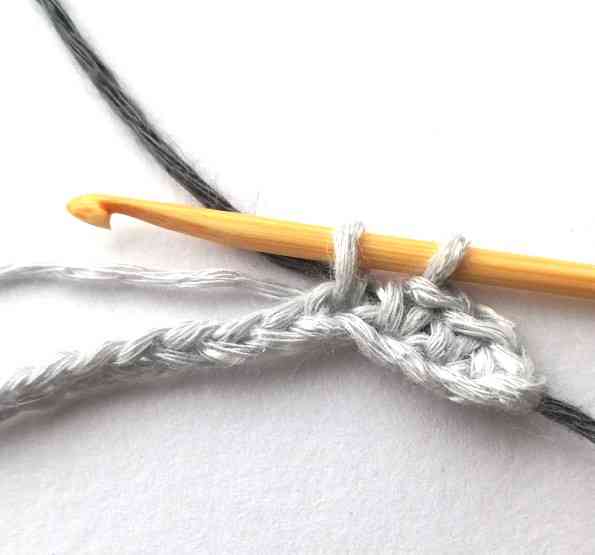
18. Finish the first sc of the second row with the dark gray yarn because the next stitch will be in dark gray too.
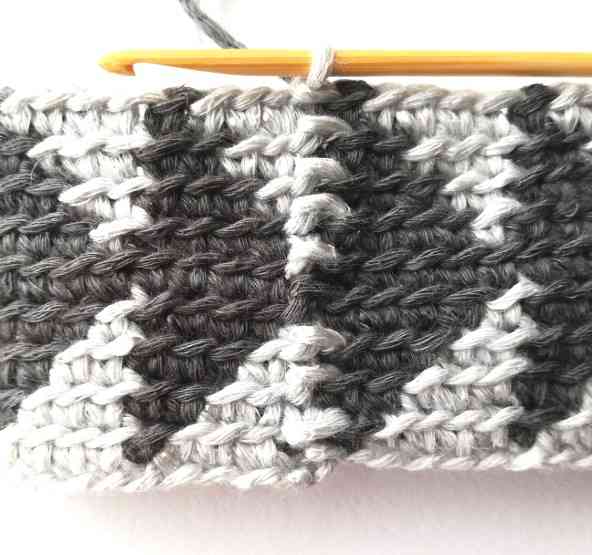
19. Follow the chart until you finish the sample. It should look like it is shown in the picture.
Working in rows: half double crochet
1. Chain 30 + 2. Put the dark gray yarn behind the chain. Yarn over the light gray yarn.
2. Insert your hook into the third chain from your hook going under the dark gray yarn.
3. Yarn over the light gray yarn and pull the yarn through. Now you have three loops on your hook.
4. Yarn over and pull the yarn through all three loops. You have just made the first hdc in light gray.
5. When you have to change the color for the next stitch, work your current stitch up until the last step. For an hdc, stop when you have three loops on your hook.
6. Move the dark gray yarn up and yarn over.
7. Pull the yarn through. You have just changed the color and you are ready for the next stitch.
8. Follow the pattern and at the end of each row chain 2 for a turning chain. The finished sample should look like it is shown in the picture.
Working in rows: double crochet
1. Chain 30 + 2 because the turning chain will count as a stitch. Yarn over.
2. Put the dark gray yarn behind the chain. Insert your hook in the fourth stitch from your hook.
3. Yarn over the light gray yarn.
4. Pull the yarn through. Now you have three loops on your hook.
5. Yarn over and pull the yarn through the first two loops on your hook. Now you have two loops on your hook.
6. Yarn over and pull the yarn through both loops on your hook. As the turning chain counts as a stitch, now you have two stitches in light gray.
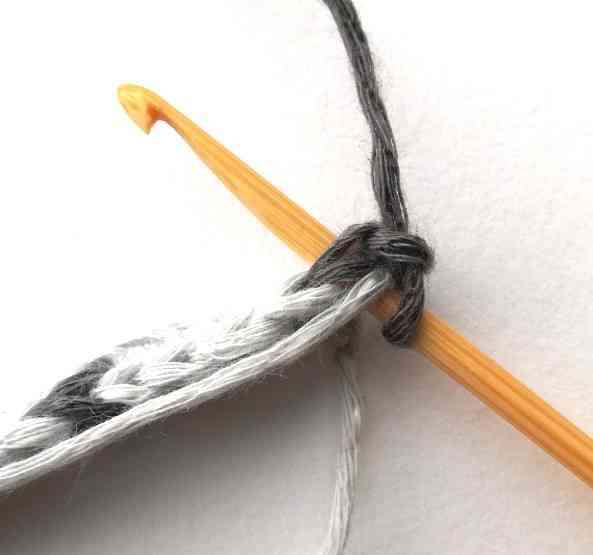
7. When you have to change the color for the next stitch, work you current stitch up until the last step. For a dc, you should stop when you have two loops on your hook.
8. Move the dark gray yarn up.
9. Yarn over the dark gray yarn and pull through both loops on your hook. You have just changed yarn color and you are ready for the next stitch.
10. When you finish the row, chain three and turn your work around. You will work the next stitch in the second dc of the previous row because the turning chain counts as a stitch.
11. Follow the chart. The finished sample should looks like it is shown in the picture.
Working in rounds: modified single crochet
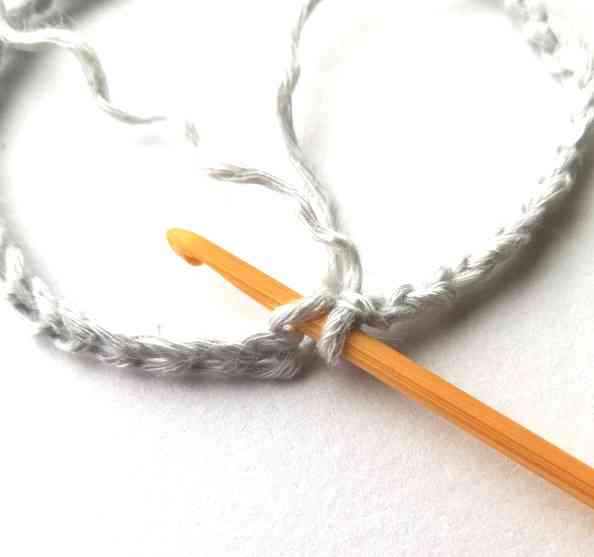
1. Chain 30. Insert your hook into the first stitch. Make sure that you are not twisting the chain.
2. Make a slip stitch.

3. Put the dark gray yarn behind the chain.
4. Chain one wrapping around the dark gray yarn. You have just made the first stitch of the first round.
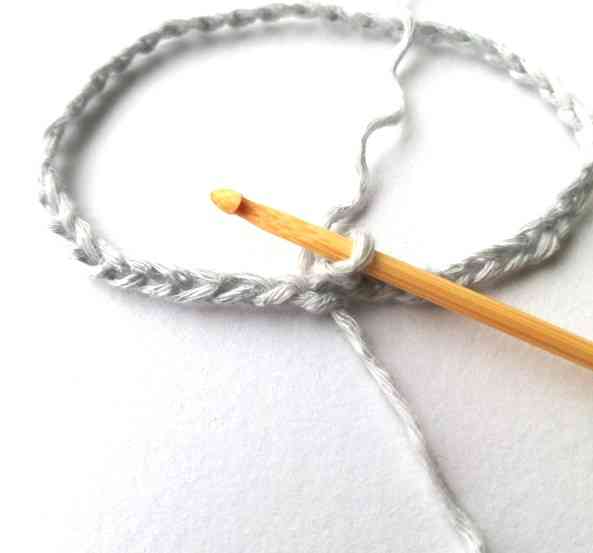
5. Insert your hook in the next chain, yarn over and pull the yarn through. Now you have two loops on your hook. To make a modified sc you need to yarn under like it is shown in the picture instead of yarning over.
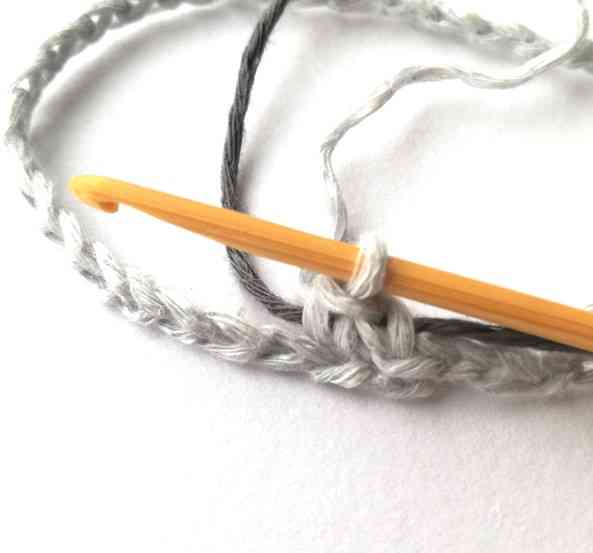
6. Pull the yarn through. You have just finished the second stitch of the first round.
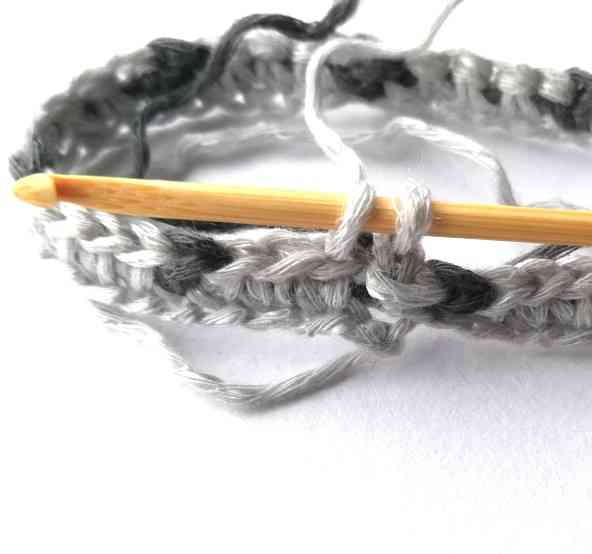
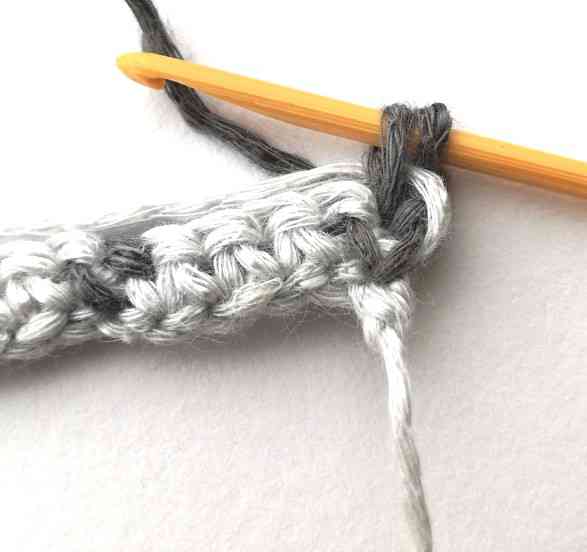
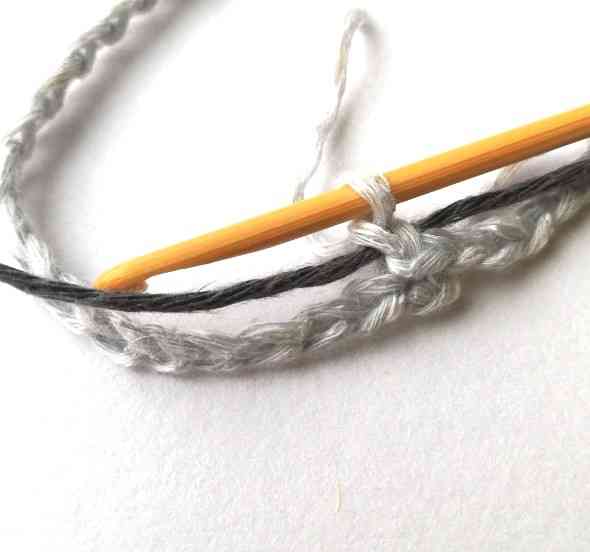
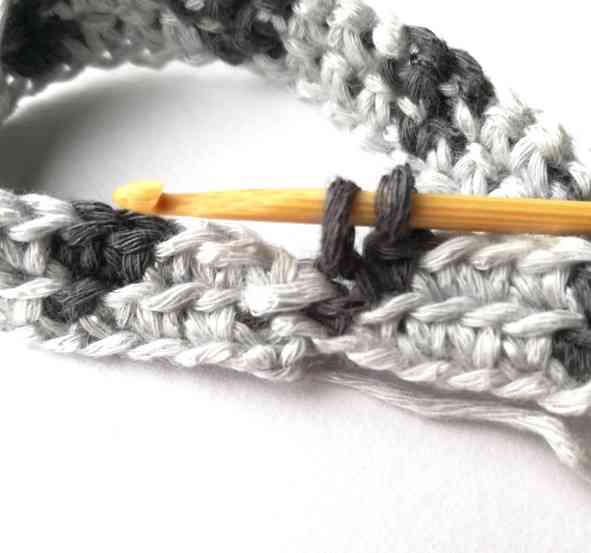
7. At the end of the round make a slip stitch into the turning chain. Chain one. Keep the dark gray yarn behind. Then insert your hook in the next stitch grabbing only the back loop. Yarn over the light gray yarn and pull the yarn through. Now you have two loops on your hook.
8. Yarn under the light gray yarn and pull the yarn through. You have just finished the second stitch of the second round.
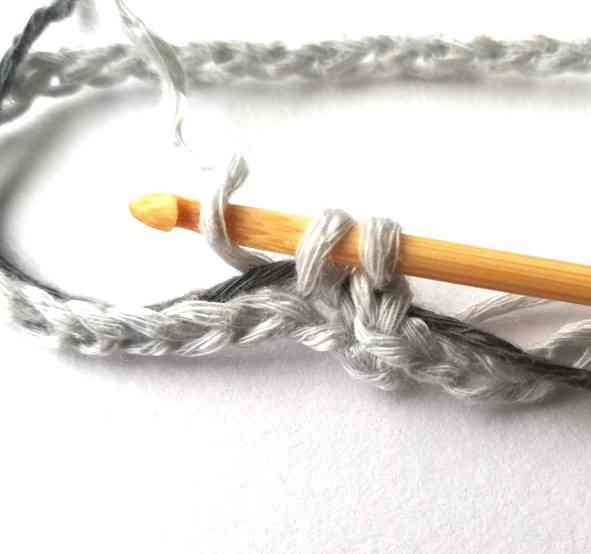
9. After a few stitches it should look like it is shown in the picture.
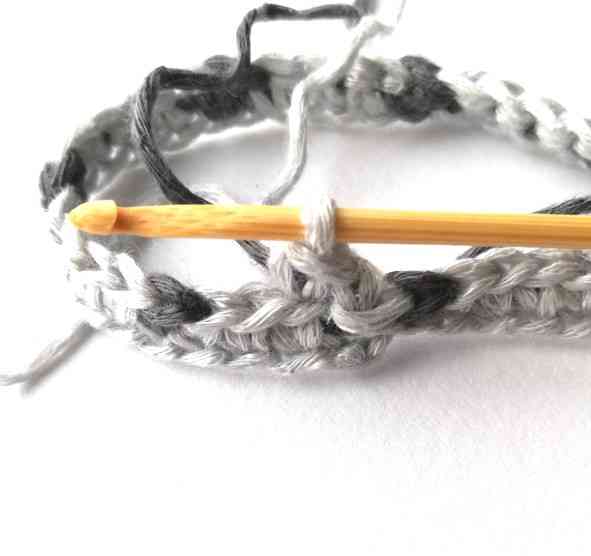
10. When the next round starts in different color (light gray), you should finish the last stitch of the current round with that color (light gray). Stop when you have two loops on your hook for the last stitch of the round.
11. Finish the stitch with the light gray yarn.
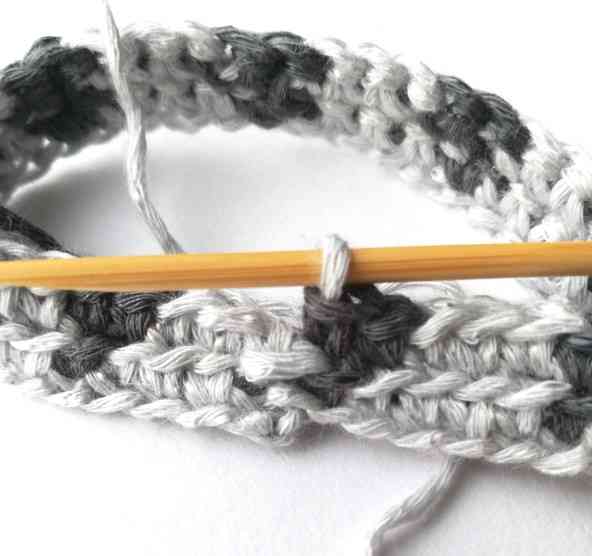
12. Make a slip stitch into the turning chain.
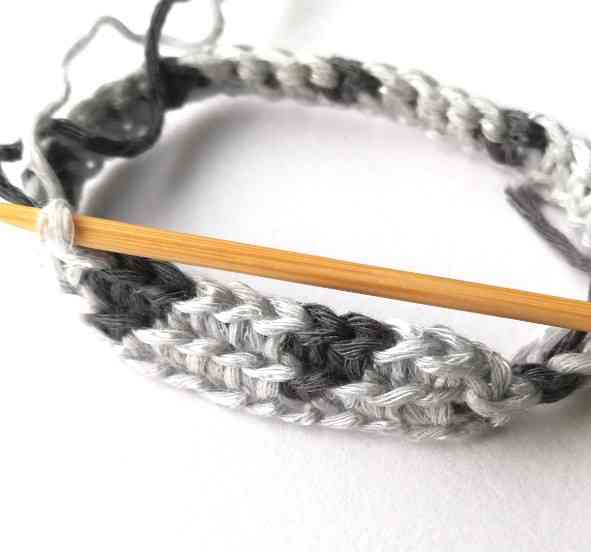
13. When you finish rounds with a slip stitch and chain one for the first stitch of the next round, you will see this line of joining. However, there will be no break in the pattern colors.

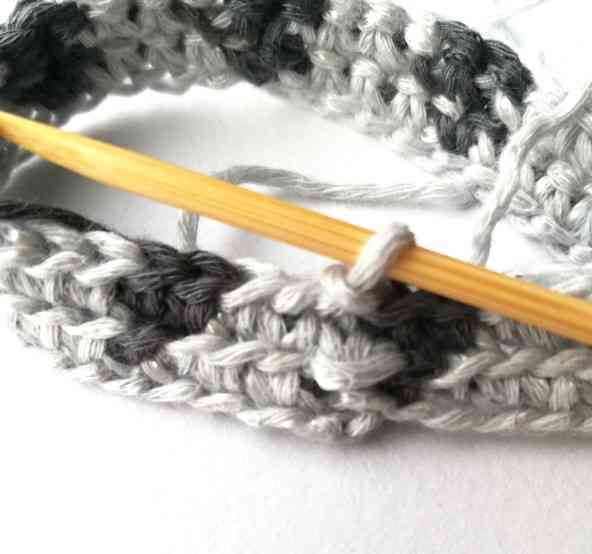
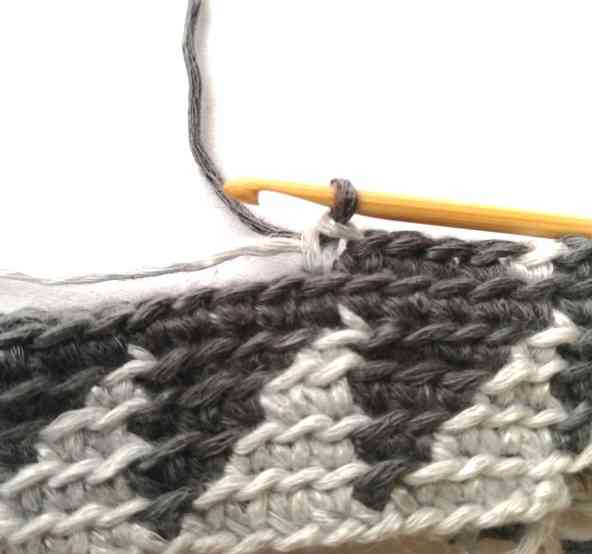
14. Alternatively you can continue to the next round without joining with a slip stitch and chaining one. When you make the last stitch of the round, make sure you have the right color ready for the next round.
15. Then simply make an msc in the next stitch. This is your first stitch of the next round. Put a marker in it so that it would be easier to see where a new round starts.
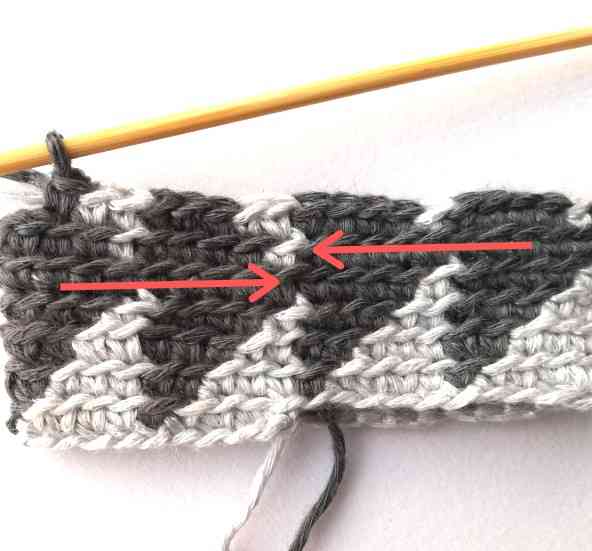
16. Continuing to the next round without making a slip stitch will make the texture of your work more even. However, there will be this break in the pattern colors, like it is shown in the picture.

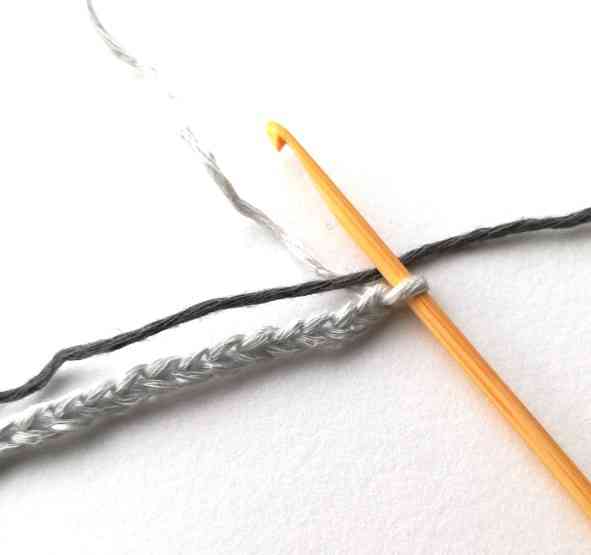
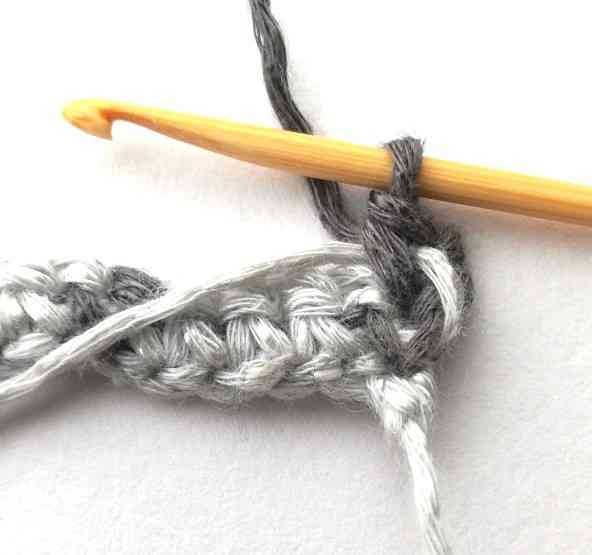
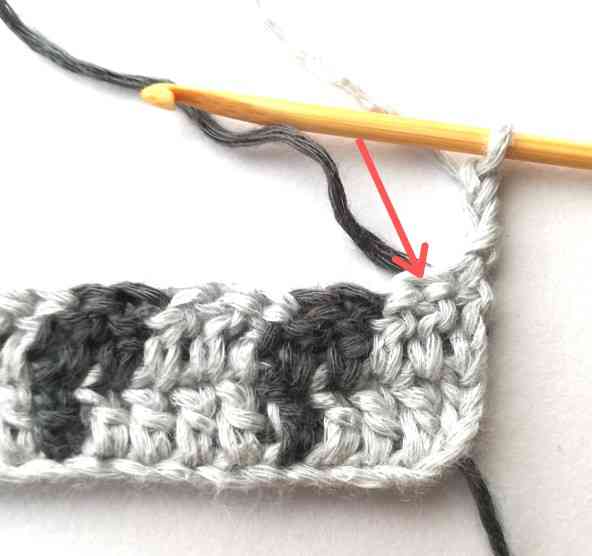
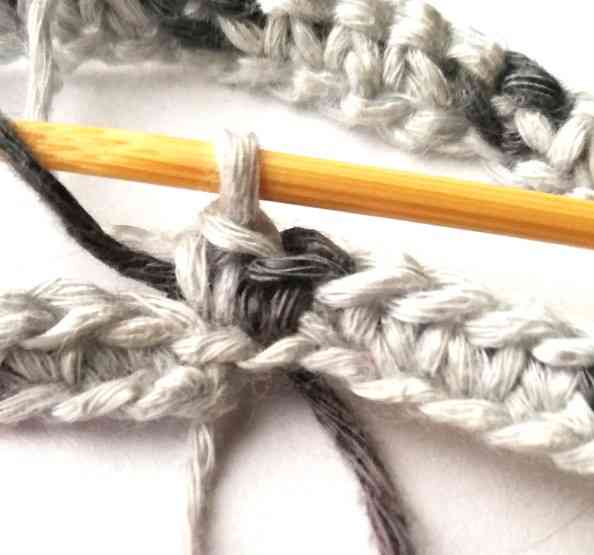
17. To prevent the yarn from tangling, when you change colors you can twist it like it is shown in the picture.
18. This twist won’t be seen when the stitch is made.
You might also like
There is much more to explore:
You can save this tutorial to Pinterest here.
What a brilliant explanation! I have tried many times to do tapestry crochet but have never been completely happy with the result. Thank you so much from a veteran crocheter.
I am really happy that it was helpful 🙂
Thank you, this tutorial will help me a lot!! Ü
I am glad 🙂
Thank you very much! Excellent explanation!
Thank you, I am glad that it was useful 🙂
What does the back of tapestry crochet look like? Is it distorted?
Actually, the back side also looks very nice and you can see the picture clearly. There is no “hanging” yarn, because you carry it along. If you use modified single crochet, your item will look a bit different on each side. But as I said, both sides are beautiful 🙂
Hello, does a modified single crochet make any difference in look compared to a normal single crochet? I’ve tried it but can’t see a difference, but I’m definitely not an expert at crochet. Thank you 🙂
Hello! Well, I agree that the difference between a single crochet back loop only and a modified single crochet is not that big. But I think that the modified single crochet hides the yarn that you carry along a bit better.
Agradezco mucho tu aportación, eres muy clara y limpia en tu manera de explicar.
Solo lo comprendí, así muy fácil.
Que amable de tu parte compartir.
Muchas gracias por tu mensaje! Me da mucho gusto que te haya sido de ayuda 🙂